The ladies behind the scene

Urban Deli will be celebrating its first year in business on July 13th.  We are also celebrating a year anniversary for two very special team members: Dale and Candy.

Food wise, everything at the Urban Deli begins with Dale and Candy who we label ‘the ladies from the second floor.’

The ladies work daily to consistently prepare our customer’s favourite menu items.  From our daily quiche, pulled pork BBQ sauce, gluten-free cheese sauce to our very popular maple vinaigrette and wasabi vinaigrette dressings, split pea and ham soup, homemade buttermilk biscuits, deli mustard right through to our muffuletta ‘muff-uh-LET-uh, Deli burgers and of course the piece de resistance….our homemade desserts.

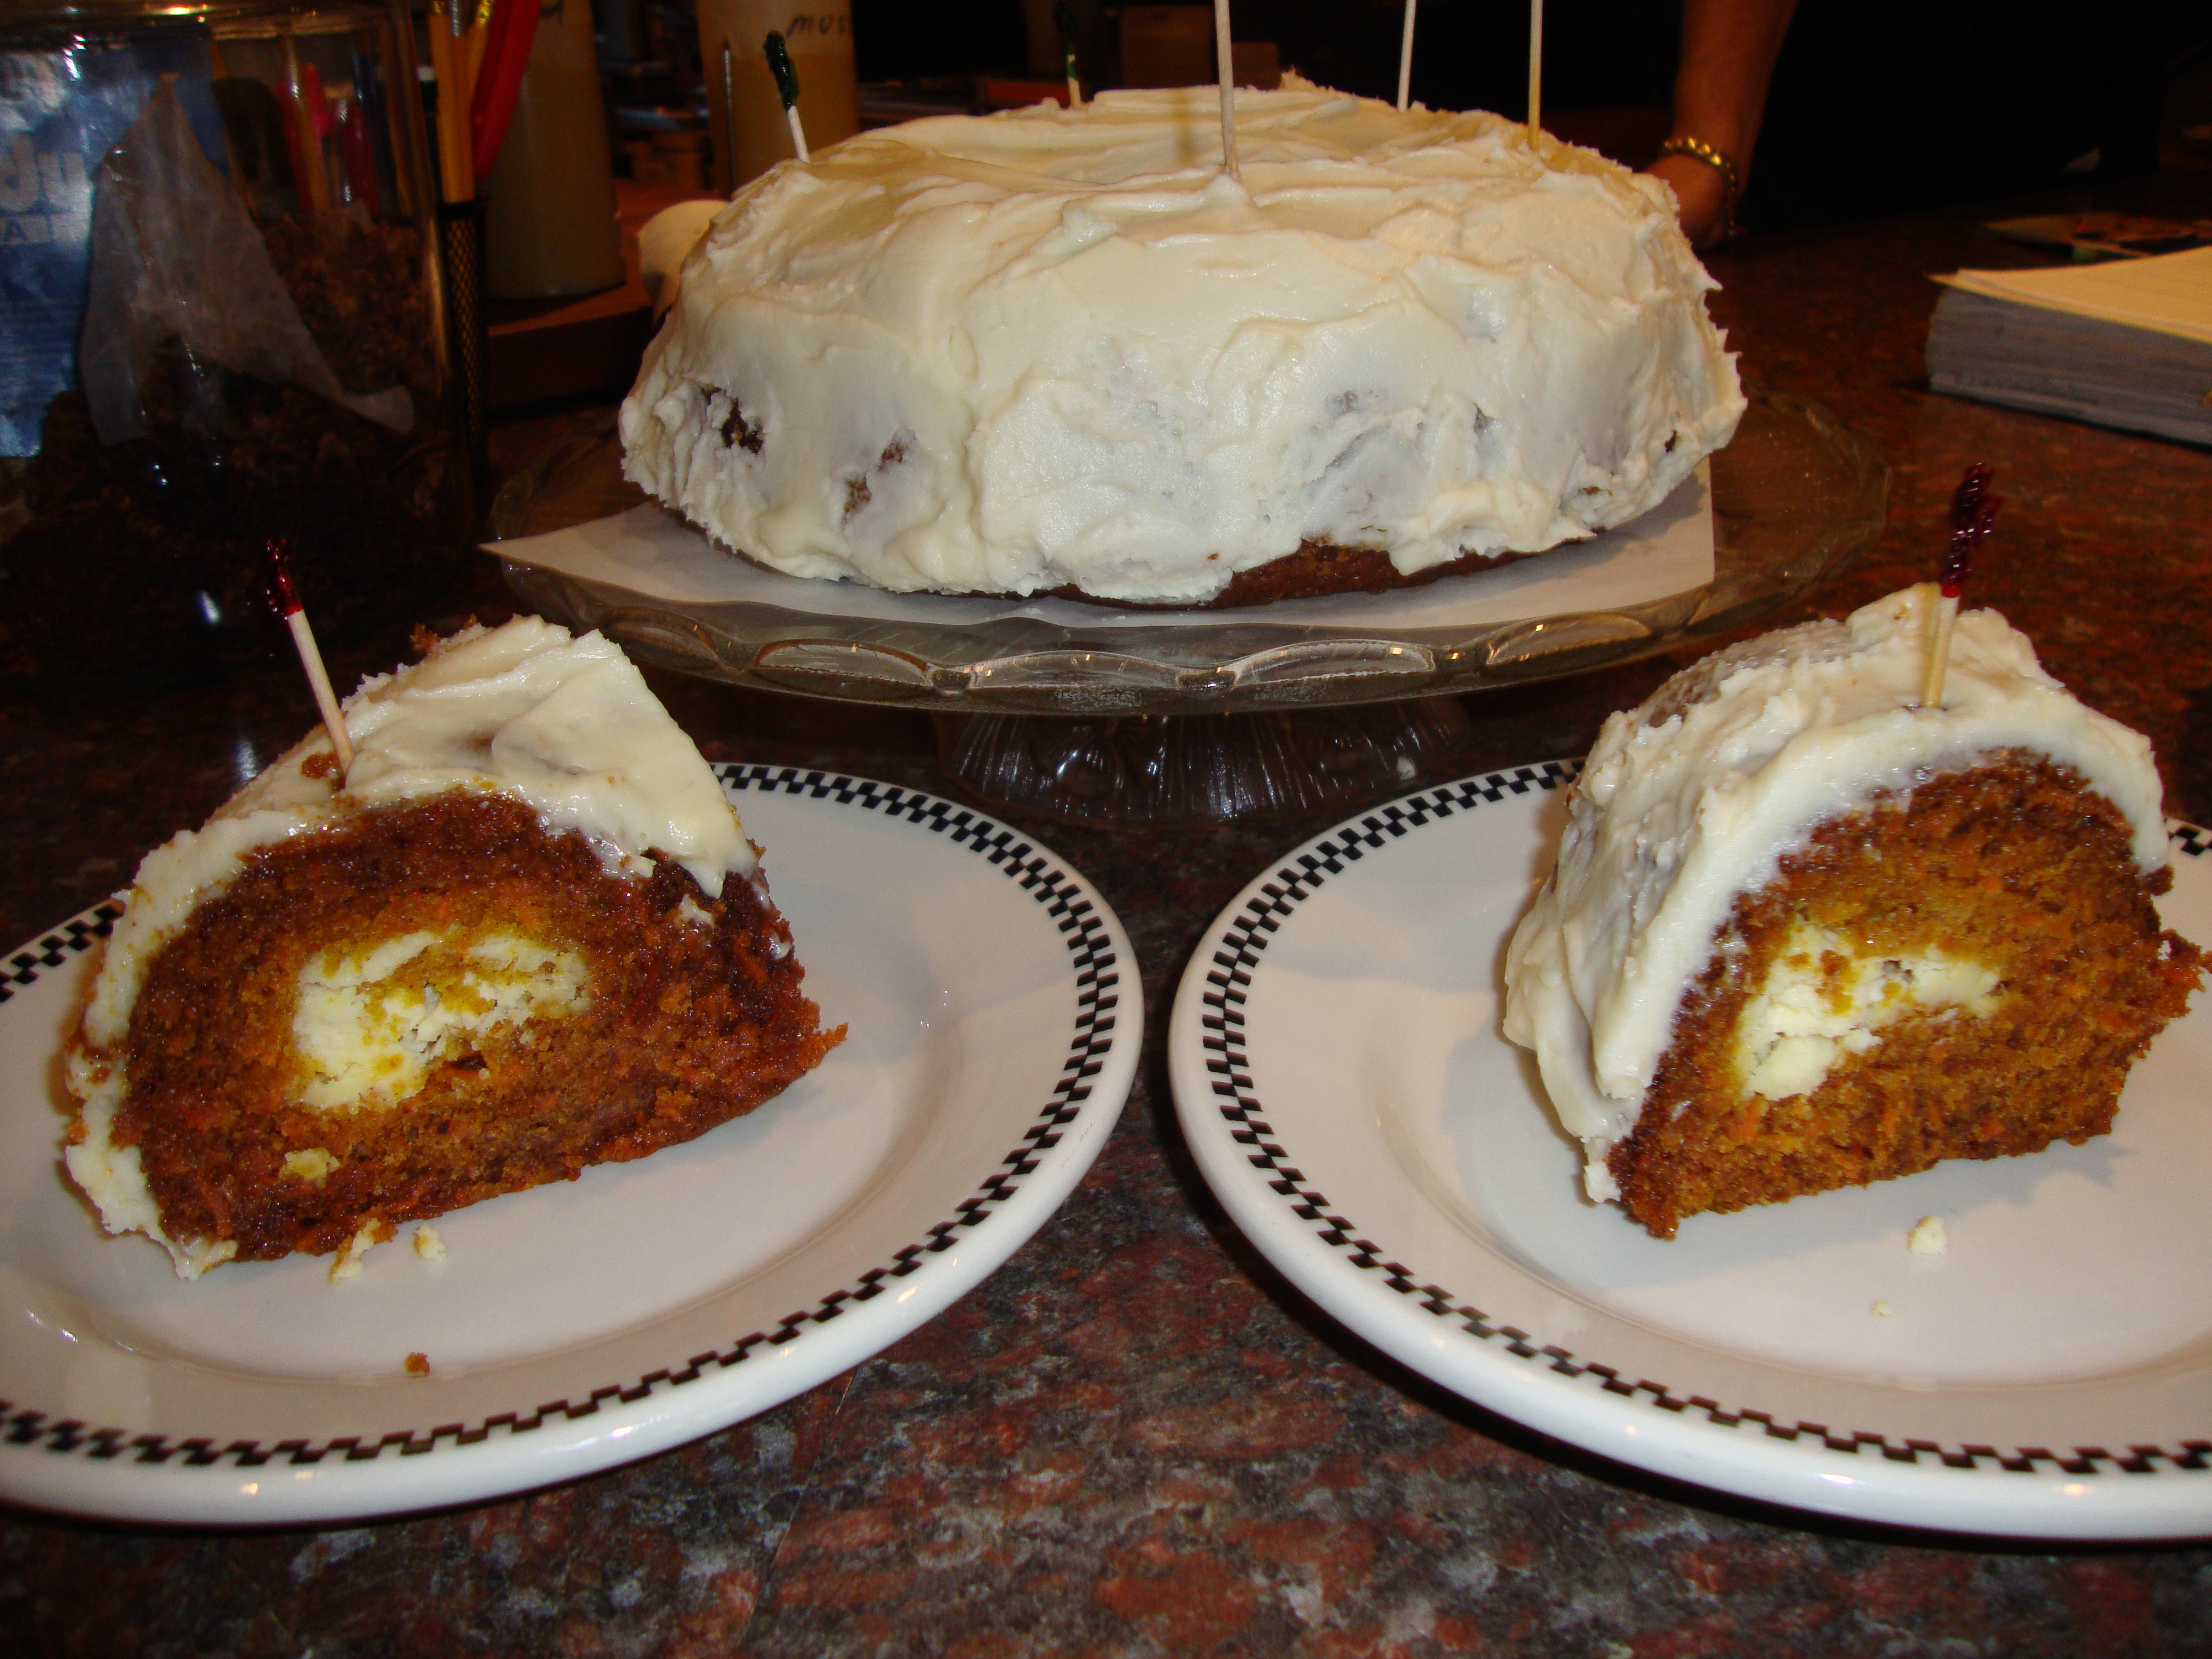
A meal without one of the Urban Deli desserts by Dale is incomplete.  Dale’s repertoire of desserts include and are not limited to; Our very popular carrot cake with filling, lemon sour cream pie, apple crumble, chocolate molten cake and cookies.  From our second floor you can find Candy and Dale working hard at squeezing lemons for our scratch lemonade or brewing our famous ice tea made from five tea blends.

Many of our products have been tweaked and fine tuned by the ladies so they can capture the right consistency.  Recipes at the Deli are always evolving and we always welcome customer feedback. For everyone at the Deli there is more to our food; It is both an art and a science.

Recipes to success are simple…hire team members like Candy and Dale who:

  • Want to be at work
  • Have a sense of humour
  • Are very reliable/committed
  • Have strong communication, organizational and time management skills
  • Want to have fun and can laugh at themselves first J
  • Don’t take things personally…because receiving ongoing feedback for the purpose of fine-tuning recipes in order to deliver a consistently great product to our customer is critical to everyone’s success

Thank you Dale and Candy and we look forward to celebrating year two with each of you!

Share

Seared beef carpaccio with peppercorn mushrooms

Carpaccio (not the seared beef carpaccio of the recipe here).I loved this recipe!  This is so refreshing and flavorful and worth the few minutes it takes to prepare and serve. It’s taken from: Company’s Coming: Practical Gourmet – Small Plates for Sharing (pages 58 & 59).

(Note: the image shown is an example of carpaccio but not that of the recipe below.)

Seared beef carpaccio with peppercorn mushrooms:

– 1 tbsp / 15 ml Montreal steak spice
– 1 tbsp / 15 ml finely chopped fresh thyme
– 1 lb / 454 g beef strip loin steak

– 1 tbsp / 15 ml cooking oil
– 5 cups / 1.25 L sliced brown mushrooms

– 1/3 cup / 75 ml brandy
– 1 tbsp / 15 ml canned green peppercorns
– 1 tbsp / 15 ml butter

– ½ cup / 125 ml Arugula leaves lightly packed

Combine Montreal steak spice and finely chopped thyme (I used dried and would have preferred fresh) in a pie pan or wide bottom bowl.  Press steak into spice mixture until coated.  Cook on a greased grill on high for about 2 minutes per side until browned and slightly crisp.  Transfer to cutting board.  Cover with foil and let stand for 10 minutes.

Heat cooking oil in a frying pan on medium-high.  Add mushrooms and cook until browned and liquid is evaporated.

Stir in brandy and peppercorns.  Add butter and stir until melted.

Cut steak across the grain into very thin slices.  Arrange with arugula and mushrooms on a serving plate.  Serves 6.

Company’s Coming describes an alternative method for cooking the Beef Carpaccio.  (I grilled it on our flat top at the Deli).  Instead of grilling the steak you can sear it using olive oil in a very hot stainless steel or cast iron frying pan.  Sear each side for only one minute.  The result will be a very thin dark crust that is quite appealing; however, it is not recommended that you use this method with a non-stick pan as the high heat may ruin the non-stick coating.

A couple of my own notes:

  • I doubled the recipe because it was for a group of 15 people as an appetizer. If you have a smaller dinner group the recipe portion is perfect!
  • I used spinach instead of arugula.  Although spinach was good the arugula would have added more of a peppery taste to further compliment the flavors.
  • When I sautéed the mushrooms, peppercorns, brandy & butter, I poured it over the spinach, which was down the centre of the platter with the beef carpaccio on both sides.
  • Squeezing a bit of fresh lemon juice down each side of the plated carpaccio enhances the flavor (personal preference).
  • Once the beef carpaccio has been left to stand for 10 minutes, you can put it in the freezer for 15 minutes to make it a bit firmer, which makes it easier for thinly slicing.  Book cover for Company’s Coming: Practical Gourmet - Small Plates  for Sharing.We used the meat slicer at the Deli and did so after the beef stood for 20 minutes.

(If you’re interested in the book, you’ll find Company’s Coming: Practical Gourmet – Small Plates for Sharing at Chapters – Indigo.)

Share

Romaine Greek salad with wild-caught shrimp (Oh! And lemonade with vodka)

Romaine Greek salad, wild-caught salmon and lemonade with vodka (Photo - Dan Jones)I love making this type of salad, and on the weekend I took full advantage of my time and spent it doing other things rather than cooking.

The dressing:

Acids to oil ratio should be about 1:3 or 4. 1 part acid to 3 or 4 parts oil. I made enough dressing that could have done a serving for 4 or 5, so I only used a bit of it. I actually didn’t measure so my measurements are guesses, just so you know.

  • Juice of one whole lemon
  • A tablespoon of balsamic vinegar
  • Olive oil, to the ratio above
  • Teaspoon of dried oregano
  • A couple squeezes of honey
  • 3 cloves of garlic, finely minced or pressed
  • A pinch of Kosher salt, a few grinds of black pepper
  • Half teaspoon of your favourite mustard, I used whole grain

I mixed all of this into a mason jar, shook vigorously, and set aside.

Salad:

  • Romaine heart, one head
  • 6 sweet cocktail tomatoes (they’re a smaller tomato available at the Superstore, really delicious for an out of season tomato)
  • Half a small red onion
  • Half an English cucumber
  • 12 Kalamata olives
  • Several small cubes of feta cheese
  • One small carrot, grated
  • A couple handfuls of wild-caught Maritime shrimp (bought at Misty Harbour Seafood)

In a large bowl, I tossed everything but the shrimp with the dressing very well. A well-tossed salad needs little dressing. I shake my head at anyone who ever asks for dressing on the side, and then awkwardly tries to coat their salad on their plate, especially if they asked for it on the side to cut down on the amount of dressing on their plate. I then topped the salad with shrimp, and served some bread on the side.

Lemonade, two large servings:

  • Rind and juice of 7 lemons plus 2 shots of vodka
  • Let that infuse with about a half a cup of sugar (or more, to taste)
  • Because I had some on hand, I also put in a few Kaffir lime leaves

I let it sit for a few hours and then I strained it, poured over two tall glasses of ice, and added another shot of vodka to each glass.

I filled each glass ¾ full, topped with sparkling mineral water, stirred, and served.

***

Bio: Dan Jones is a food, drink, and travel writer from Saint John. Follow him on Twitter: @danjjj

Share

Cooking class – a new first for Urban Deli

cookingclass_201003_03_1A group of twenty or so people convened at the Urban Deli on a sunny Sunday afternoon on March 14th to participate in the first cooking class hosted by UD. The restaurant is normally closed on Sundays, but Liz decided to open up for a few hours to host this reservation-only event. Bob McVicar was the instructing chef and the subject of the day was Italian-style cabbage rolls.

The afternoon began with some informal introductions and delicious snacks (check out this sautéed red pepper recipe), and then we all found seats at the communal table in groups of four. To ensure that the objective of the class was clear, Bob served us each a sample of his Italian cabbage rolls that he had put together a couple of days prior – Bob swears that they are better a few days after making them. We also sampled some homemade Italian sausage that UD has recently started making in-house.

Next, we worked in our groups of four to create some of Bob’s Italian cabbage rolls. We made half of the recipe below, which resulted in a roasting pan full of cabbage rolls. Bob did some of the prep work before we arrived and had already softened and peeled the cabbage leaves off of the head for us as well as having prepared the tomato sauce. Our main tasks were to create the filling and put the rolls together.

Cooking class - be willing to get your hands dirty.Bob’s recipe for the filling is simple to put together and rolling it in the leaves is pretty easy once you get used to it. You’ll need to be willing to get your hands dirty for this dish, so dig in and have some fun. Just follow the recipe and preparation instructions below and you’ll have no problems.

After assembling all of our rolls, we packed them up and topped them with some delicious tomato sauce. Each participant received a portion to take home, at which point they simply had to be baked and served fresh, saved for a few days before eating, or placed in the freezer to consume at a later date.

cookingclass_201003_05_1The cooking class was an enjoyable afternoon and a great value at only $12 per person, which was to help cover some of the costs. Beverages were also available to purchase and the snacks continued to flow throughout the afternoon. This cooking class was a successful first for UD and I suspect that there will be many more to come. Stay tuned to urbandeli.ca for info about future cooking classes that Liz has in the works.

Italian Cabbage Rolls – download recipe by Bob McVicar:

***

This article was written by our guest author, Trisha Gallant, who is also an Urban Deli regular.

Share

Pork fried rice with veggies

Pork fried rice with veggies (photo - Dan Jones)I thought I was going to make chicken fried rice, but I guess that bag in the fridge that my girlfriend took out of the freezer was actually pork.

I wouldn’t really call this a recipe because one could put anything they want in this dish and really, the only thing required is to cook the rice early and then cool it in the fridge. All Chinese restaurants use this technique for fried rice, or at least they should. Using freshly cooked rice will result in a huge lump of goo.

Mixing the other ingredients with the rice in a bowl and then serving isn’t fried rice, although it may also be tasty.

To start off, I seasoned some vegetable oil by combining it in a small pot with fresh ginger, garlic, lemongrass, a chili pepper, star anise, and white peppercorns. I let this simmer for about an hour, before straining and setting it aside until it was time to start cooking.

I used a couple hundred grams of pork, an egg, half a yellow bell pepper, a small handful of green beans, five small mushrooms, one stalk of celery, a small carrot, and 1/3 cup of frozen peas and corn (thawed in microwave, water drained).

I stir-fried the meat, veggies, and egg on medium high heat, and then added the cooled rice, along with several shakes of soy sauce, a few drops of fish sauce and sesame oil, and a small splash of rice wine vinegar.

I also toasted some sesame seeds and sliced a couple of green onions for garnishing the dish when serving.

***

Bio: Dan Jones is a food, drink, and travel writer from Saint John. Follow him on Twitter: @danjjj

Share

Sautéed red peppers – so versatile!

Red peppersThis dish is versatile, easy to make and requires minimal ingredients — and it is so delicious!

The sautéed red peppers are equally great as a stand-alone dish or a  compliment to other dishes such as a topping for steamed chicken, pasta, or salads and served with a nice Italian bread or baguette, or with grilled sausages.

My sister Michael-Ann and her girlfriend Jodi recently visited Saint John from Manhattan (one of my favorite food cities).  Jodi, who also lived in Italy for a few years, prepared one of her many recipes, which were taught to her in the kitchens of Italy.

I made the sautéed red peppers this past Saturday following Jodi’s recipe and found it easy and the results were fantastic!

Ingredients:

  1. Extra virgin olive oil — approx 3/4 to 1 cup (I used a 10.5” skillet – measured the width of the top lip opening of my skillet)
  2. 2 to 3 Garlic Cloves
  3. 8 to 9 red peppers (yellow can be used too and mixed in). Cut into large pieces – skins on. (I used 11 red peppers with my skillet size. I cut each pepper in half, top to bottom, removed the seed core and the top green stem and then cut each half into six long slices, again cutting top to bottom.)
  4. Approximately 1/2 cup Kalamata olives, pitted (I used black olives and wished I had used Kalamata olives simply for the better flavor)
  5. 2 tablespoons of capers (If using dried salted capers less is needed as they can be salty)
  6. Salt

Method:

Coat large skillet with extra virgin olive oil ¾ to 1 cup (approx 1/4 inch).  Add garlic cloves cut into 2 to 3 large pieces.  Heat oil and garlic until garlic starts to brown but do not completely brown the garlic.

Add cut red peppers to hot oil.  Do not worry if the peppers are heaping over the skillet because they will melt down as they are heated.  To help keep the peppers in place use a lid smaller than the skillet and press down.  Slowly start to rotate the peppers as they cook down.  Turn the peppers frequently.  (I cooked the peppers at a simmer and for 1.5 hours … Ok, I started talking and got side tracked … It all worked out for the good though.)

When the peppers are softened in the oil, add the Kalamata olives, capers and salt to taste.  Cook the peppers until the oil turns to a clear red color and the peppers are soft.  There should be no crunch at all to your sauteed peppers.

Serve hot, warm or cold. It’s even better on day two!

***

Bio: Liz is the owner of the Urban Deli. With a sister in Manhattan, she has visited New York many times and invariably studies the Big Apple’s famous delis.

Share